ESP32 WITH DATA VISUALIZATION
Pada percobaan kali ini, dijelaskan mengenai pembacaan sensor ke database MySQL menggunakan ESP32. Selanjutnya, dibuat halaman web untuk menampilkan hasil pembacaan sensor, waktu pembacaan dan informasi lainnya dari database. Pembacaan sensor ditampilkan dalam bentuk plot kurva. Sensor yang digunakan pada percobaan ini adalah sensor BMP180.
Pada percobaan ini, komponen dan perangkat yang dibutuhkan sebagai berikut.
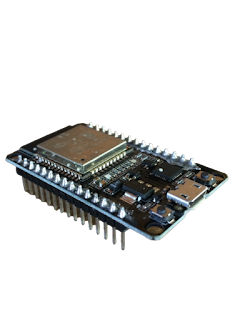
1. ESP32 DEVKIT V1 Board (yang saya gunakan 30 pin)
2. Arduino IDE

4. PC / Laptop

6. Jumper wires (yang saya gunakan female to male) sebanyak 4 buah

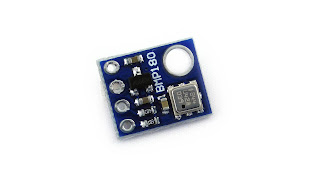
7. Sensor BMP180
8. Breadboard

9. 000webhost ( https://www.000webhost.com )

Langkah - langkah pengerjaan :
Pertama, merangkai komponen sebagai berikut.

Keterangan :
1. GPIO GND menuju GND BMP180
2. GPIO 3V3 menuju VCC BMP180
3. GPIO D21 menuju SDA BMP180
4. GPIO D22 menuju SCL BMP180
Kedua, membuat hosting web. Hosting yang digunakan pada percobaan ini adalah 000webhost. Apabila belum mendaftar, sebaiknya mendaftar free account terlebih dahulu. Namun, jika telah mendaftar, pilih sign in.
Ketiga, buat project dengan memberi nama dan password untuk website.
Keempat, pilih upload your site. Setelah berhasil, akan muncul halaman seperti berikut.

Kelima, membuat file esp_data.php dan index.php pada folder public_html. Cara membuat file baru adalah klik 2x folder public_html > new file.

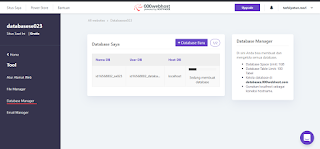
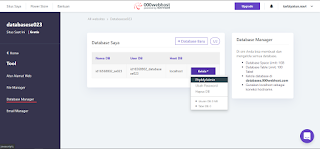
Keenam, kembali ke halaman utama dan pilih Tools > Database Manager > Create Database. Lengkapi semua isian dan pastikan copy semua informasi database.
Ketujuh, apabila telah berhasil, pilih Manage > PhpMyAdmin.
Ke-delapan, pada halaman PhpMyAdmin, pilih database yang telah dibuat > sql > tulis query berikut.
CREATE TABLE Sensor (
    id INT(6) UNSIGNED AUTO_INCREMENT PRIMARY KEY,
    sensor VARCHAR(30) NOT NULL,
    location VARCHAR(30) NOT NULL,
    value1 VARCHAR(10),
    value2 VARCHAR(10),
    value3 VARCHAR(10),
    reading_time TIMESTAMP DEFAULT CURRENT_TIMESTAMP ON UPDATE CURRENT_TIMESTAMP
)
Ke-sembilan, untuk melihat tabel yang telah dibuat, dapat dilihat pada structure.
Ke-sepuluh, kembali ke file manager. Pilih public_html > post_data.php. Tulis code berikut.
<?php $servername = "localhost";// REPLACE with your Database name// Keep this API Key value to be compatible with the ESP32 code provided in the project page. // If you change this value, the ESP32 sketch needs to match $api_key_value = "tPmAT5Ab3j7F9"; $api_key= $sensor = $location = $value1 = $value2 = $value3 = ""; if ($_SERVER["REQUEST_METHOD"] == "POST") { $api_key = test_input($_POST["api_key"]); if($api_key == $api_key_value) { $sensor = test_input($_POST["sensor"]); $location = test_input($_POST["location"]); $value1 = test_input($_POST["value1"]); $value2 = test_input($_POST["value2"]); $value3 = test_input($_POST["value3"]); // Create connection $conn = new mysqli($servername, $username, $password, $dbname); // Check connection if ($conn->connect_error) { die("Connection failed: " . $conn->connect_error); } $sql = "INSERT INTO Sensor (value1, value2, value3) VALUES ('" . $value1 . "', '" . $value2 . "', '" . $value3 . "')"; if ($conn->query($sql) === TRUE) { echo "New record created successfully"; } else { echo "Error: " . $sql . "<br>" . $conn->error; } $conn->close(); } else { echo "Wrong API Key provided."; } } else { echo "No data posted with HTTP POST."; } function test_input($data) { $data = trim($data); $data = stripslashes($data); $data = htmlspecialchars($data); return $data; }
$dbname = "REPLACE_WITH_YOUR_DATABASE_NAME";
// REPLACE with Database user
$username = "REPLACE_WITH_YOUR_USERNAME";
// REPLACE with Database user password
$password = "REPLACE_WITH_YOUR_PASSWORD";
Ke-sebelas, nilai variabel harus diubah sesuai database yang telah dibuat.
// REPLACE with your Database name
$dbname = "REPLACE_WITH_YOUR_DATABASE_NAME";
// REPLACE with Database user
$username = "REPLACE_WITH_YOUR_USERNAME";
// REPLACE with Database user password
$password = "REPLACE_WITH_YOUR_PASSWORD";
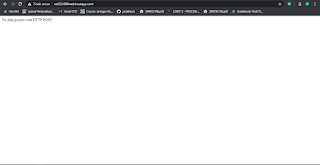
Ke-duabelas, periksa keberhasilan dengan mengakses http://example-domain.com/post_data.php. Apabila berhasil, akan menampilkan seperti berikut.
Ke-tigabelas, kembali ke file manager. Pilih public_html > esp_chart.php. Tulis code berikut.
<?php $servername = "localhost";// REPLACE with your Database name// Create connection $conn = new mysqli($servername, $username, $password, $dbname); // Check connection if ($conn->connect_error) { die("Connection failed: " . $conn->connect_error); } $sql = "SELECT id, value1, value2, value3, reading_time FROM Sensor order by reading_time desc limit 40"; $result = $conn->query($sql); while ($data = $result->fetch_assoc()){ $sensor_data[] = $data; } $readings_time = array_column($sensor_data, 'reading_time'); // ******* Uncomment to convert readings time array to your timezone ******** /*$i = 0; foreach ($readings_time as $reading){ // Uncomment to set timezone to - 1 hour (you can change 1 to any number) $readings_time[$i] = date("Y-m-d H:i:s", strtotime("$reading - 1 hours")); // Uncomment to set timezone to + 4 hours (you can change 4 to any number) //$readings_time[$i] = date("Y-m-d H:i:s", strtotime("$reading + 4 hours")); $i += 1; }*/ $value1 = json_encode(array_reverse(array_column($sensor_data, 'value1')), JSON_NUMERIC_CHECK); $value2 = json_encode(array_reverse(array_column($sensor_data, 'value2')), JSON_NUMERIC_CHECK); $value3 = json_encode(array_reverse(array_column($sensor_data, 'value3')), JSON_NUMERIC_CHECK); $reading_time = json_encode(array_reverse($readings_time), JSON_NUMERIC_CHECK); /*echo $value1; echo $value2; echo $value3; echo $reading_time;*/ $result->free(); $conn->close(); ?> <!DOCTYPE html> <html> <meta name="viewport" content="width=device-width, initial-scale=1"> <script src="https://code.highcharts.com/highcharts.js"></script> <style> body { min-width: 310px; max-width: 1280px; height: 500px; margin: 0 auto; } h2 { font-family: Arial; font-size: 2.5rem; text-align: center; } </style> <body> <h2>ESP Weather Station</h2> <div id="chart-temperature" class="container"></div> <div id="chart-pressure" class="container"></div> <div id="chart-altitude" class="container"></div> <script> var value1 = <?php echo $value1; ?>; var value2 = <?php echo $value2; ?>; var value3 = <?php echo $value3; ?>; var reading_time = <?php echo $reading_time; ?>; var chartT = new Highcharts.Chart({ chart:{ renderTo : 'chart-temperature' }, title: { text: 'BMP180 Temperature' }, series: [{ showInLegend: false, data: value1 }], plotOptions: { line: { animation: false, dataLabels: { enabled: true } }, series: { color: '#059e8a' } }, xAxis: { type: 'datetime', categories: reading_time }, yAxis: { title: { text: 'Temperature (Celsius)' } //title: { text: 'Temperature (Fahrenheit)' } }, credits: { enabled: false } }); var chartP = new Highcharts.Chart({ chart:{ renderTo:'chart-pressure' }, title: { text: 'BMP180 Pressure' }, series: [{ showInLegend: false, data: value3 }], plotOptions: { line: { animation: false, dataLabels: { enabled: true } }, series: { color: '#18009c' } }, xAxis: { type: 'datetime', categories: reading_time }, yAxis: { title: { text: 'Pressure (Pa)' } }, credits: { enabled: false } }); var chartA = new Highcharts.Chart({ chart:{ renderTo:'chart-altitude' }, title: { text: 'BMP180 Altitude' }, series: [{ showInLegend: false, data: value3 }], plotOptions: { line: { animation: false, dataLabels: { enabled: true } }, series: { color: '#18009c' } }, xAxis: { type: 'datetime', categories: reading_time }, yAxis: { title: { text: 'Altitude (meters)' } }, credits: { enabled: false } }); </script> </body> </html>
$dbname = "REPLACE_WITH_YOUR_DATABASE_NAME";
// REPLACE with Database user
$username = "REPLACE_WITH_YOUR_USERNAME";
// REPLACE with Database user password
$password = "REPLACE_WITH_YOUR_PASSWORD";
Ke-empatbelas, nilai variabel harus diubah sesuai database yang telah dibuat.
// REPLACE with your Database name
$dbname = "REPLACE_WITH_YOUR_DATABASE_NAME";
// REPLACE with Database user
$username = "REPLACE_WITH_YOUR_USERNAME";
// REPLACE with Database user password
$password = "REPLACE_WITH_YOUR_PASSWORD";
Ke-limabelas, periksa keberhasilan dengan mengakses http://example-domain.com/esp_chart.php. Apabila berhasil, akan menampilkan seperti berikut.

#ifdef ESP32
  #include <WiFi.h>
  #include <HTTPClient.h>
#else
  #include <ESP8266WiFi.h>
  #include <ESP8266HTTPClient.h>
  #include <WiFiClient.h>
#endif

#include <Wire.h>
#include <Adafruit_Sensor.h>
#include <Adafruit_BMP085.h>

// Replace with your network credentials
const char* ssid     = "REPLACE_WITH YOUR_SSID";
const char* password = "REPLACE_WITH_YOUR_ PASSWORD";

// REPLACE with your Domain name and URL path or IP address with path
const char* serverName = "http://example-domain/post_data.php";

// Keep this API Key value to be compatible with the PHP code provided in the project page.
// If you change the apiKeyValue value, the PHP file /post-esp-data.php also needs to have the same key
String apiKeyValue = "tPmAT5Ab3j7F9";

String sensorName = "BMP180";
String sensorLocation = "Office";

/*#include <SPI.h>
#define BMP_SCK 18
#define BMP_MISO 19
#define BMP_MOSI 23
#define BMP_CS 5*/


Adafruit_BMP085 bmp;
void setup() {
  Serial.begin(115200);

  WiFi.begin(ssid, password);
  Serial.println("Connecting");
  while(WiFi.status() != WL_CONNECTED) {
    delay(500);
    Serial.print(".");
  }
  Serial.println("");
  Serial.print("Connected to WiFi network with IP Address: ");
  Serial.println(WiFi.localIP());

  // (you can also pass in a Wire library object like &Wire2)
  bool status = bmp.begin(0x76);
  if (!status) {
    Serial.println("Could not find a valid BMP180 sensor, check wiring or change I2C address!");
    while (1);
  }
}

void loop() {
  //Check WiFi connection status
  if(WiFi.status()== WL_CONNECTED){
    HTTPClient http;

    // Your Domain name with URL path or IP address with path
    http.begin(serverName);

    // Specify content-type header
    http.addHeader("Content-Type", "application/x-www-form-urlencoded");

    // Prepare your HTTP POST request data
    String httpRequestData = "api_key=" + apiKeyValue + "&sensor=" + sensorName
                          + "&location=" + sensorLocation + "&value1=" + String(bmp.readTemperature())
                          + "&value2=" + String(bmp.readPressure()/100.0F) + "&value3=" + String(bmp.readAltitude())+ "";
    Serial.print("httpRequestData: ");
    Serial.println(httpRequestData);

    // You can comment the httpRequestData variable above
    // then, use the httpRequestData variable below (for testing purposes without the BMP180 sensor)
    //String httpRequestData = "api_key=tPmAT5Ab3j7F9&sensor=BME280&location=Office&value1=24.75&value2=49.54&value3=1005.14";

    // Send HTTP POST request
    int httpResponseCode = http.POST(httpRequestData);

    // If you need an HTTP request with a content type: text/plain
    //http.addHeader("Content-Type", "text/plain");
    //int httpResponseCode = http.POST("Hello, World!");

    // If you need an HTTP request with a content type: application/json, use the following:
    //http.addHeader("Content-Type", "application/json");
    //int httpResponseCode = http.POST("{\"value1\":\"19\",\"value2\":\"67\",\"value3\":\"78\"}");

    if (httpResponseCode>0) {
      Serial.print("HTTP Response code: ");
      Serial.println(httpResponseCode);
    }
    else {
      Serial.print("Error code: ");
      Serial.println(httpResponseCode);
    }
    // Free resources
    http.end();
  }
  else {
    Serial.println("WiFi Disconnected");
  }
  //Send an HTTP POST request every 30 seconds
  delay(30000);
}
Sebelum verify dan upload, berikut hal yang harus diperhatikan :
1. Import semua library yang dibutuhkan.
2. Mengubah nilai variabel yang perlu diubah.
3. Menginisialisasi pembacaan BMP180.
Ke-tujuhbelas, upload dan verify. Kemudian buka pada Serial Monitor apakah sensor dapat dibaca.
Ke-delapanbelas, buka http://domain-example/esp_chart.php. Apabila berhasil, pembacaan sensor akan terlihat hasilnya seperti gambar berikut.

Ke-sembilanbelas, kembali ke halaman PhpMyAdmin > refresh > buka Sensor.

Berikut video hasil percobaan yang dilakukan.
Komentar
Posting Komentar